Translate

Sunday 20 December 2020

Another Santa

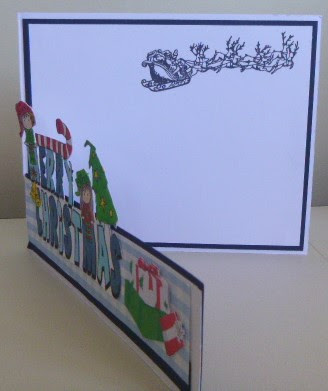
Another card with beccy's image I got the background image from pinterest and Santa went onto the image as well I like it when a image goes like that saves having to fussy cut it and add it on afterwards. Backing Paper is, from my stash, adhered to blue card, used a gold ribbon which says merry Christmas which is hard to see then added a bow with a bell 

Entering into                                                     https://beccyschallenges.blogspot.com/2020/12/december-challenge.html


Tuesday 15 December 2020

Layered circle card


The theme for this months swap card was a layered circle card So I found a tutorial on the net and made my card The image was from Beccys already coloured. The backing paper was from my stash and I used red,green and brown, to do the circle, to match the colours of Santa I used the ribbon across to hide the joins of the circle I also used a wink of stella on the beard but you can't see nit on the photo

Am entering in

Sunday 13 December 2020

My craft Room


 At long last my craft room is back in use. We have re carpeted our house, so my husband, Robin decided to give my room a spruce up first. So it took me about three weeks to empty everything into the garage, and I had a good sort out while I was at it.I  threw a lot of junk out. I am a crafter so therefore a hoarder but honestly I did have a lot of rubbish. I was just pleased Robin was away for those three weeks so I could do it myself. There are just some things a man should not do So my room is in use again just as well as I have a my grandson Alex staying with me for about four to five days while his mum is still at work.


My Empty craftroom

My stash in the kids bedroom the beds have not been put back up yet didn't know where they would go at that time


Changed my desk it is now facing out to the drive way instead of the street has made the room feel a lot bigger

These shelves were in the corner (where the scan n cut is) on top of each other so had Robin put them on the wall rather pleased with them like that


A couple of bins with all my card and  some of my backing papers  fit  snugly behind me under the window 

Then the cupboard is beside that with my ribbon rack attached to the side.
The cupboard has been turned around as well


All done now, got new curtains as well also got a continuous track made so I can completely close the curtains so now I don't have to sit with the sun in my eyes


Thursday 10 December 2020

What a mess

This weeks DT call for Creative Knockouts was this cute image from thepapershelter.com called what a mess

I made mine an easel card. I coloured the image with copics then lightly distress inked the edges, I found two lots of dotty backing paper from my stash. The top part  I adhered the backing paper onto pink card, so you don't see the marker if it bleeds through the card. The box the lights was in I did twice so I could put it onto the card with foam. The bottom piece of the card  I made a bit of a boob and had to take the backing paper off the card, it got a wee bit wrinkly so I ended up putting ribbon on the edges so you couldn't see it The sentiment I did on the computer.


Tuesday 24 November 2020

Christmas Delight

This week at creativeknockoutsmy DT  image is from Bugaboo it is ava and deacon merry christmas 


The inside of the card had a layer of blue card then a layer of white card I stamped Santa to the top and left it uncoloured I cut the front of the card down so I could sit the image on the top used some Blue gingham backing paper and adhered a strip of blue card to the bottom.I coloured the image with copics adhered it to another piece of thin card,as some of the colour bled through the card, I then cut it out and adhered to front of card.Added the presents
This is the inside
This is fully open and this is why I always put an extra layer on my images as I think it spoils the card if you can see it with patches of copic marker
Am sharing at 


Friday 9 October 2020

Borders

My DT card for creativeknockouts for October 29th is Border time 

I am ahead of my time, as I have to empty my craft room as it's getting a makeover and and we are putting new carpet throughout the whole house I have been working on it for the past two weeks as I am trying to put the things I use the most into the garage last, that's not working too good 

Any way back to the card

The Image I am using is biker chic from Leanns world, the borders I cut with a punch and adhered then to a white base card,then  a bit of a old map I cut up,then another piece of purple card the image i coloured with copics cut her out on the scan n cut  and another one with plain card then adhered them together I thought that would be enough to 3D her but it wasn't so I ended up putting foam pieces on her, the compass and key (I had to go and get from a box in the garage) the compass is on a part of a flower in white to make it stand out the sentiment I did on the computer reads "where your'e headed is more important than how fast you are going" there is a little rose on the top corner of it

Sunday 27 September 2020

Another cake on fire

Just fell in love with this set of stamps and this time I have used the little girl from the https://payhip.com empty pockets set, there is another image of the girl with her pockets opened out and there is one of a boy as well.
I embossed both pieces of card with a flourish eb folder the white piece I have finger painted on the top I made a gilding wax by using a mixture of clear shoe polish and eye shadow  works well and when it is dry it doesn't come off I adhered both to a white base card I then printed off the image and the stamps the coloured with copics adhered it to silver card then onto the card I made the flower using a die and the leaves from a punch Inside card it reads
"You don't look a day over whatever age your pretending to be"

This one is my oops one I made the image a bit too big for my normal size card so had to do it on a different size card. I covered the white base card with this backing paper from my stash the image was adhered to a light blue card coloured the image with copics I put her on a tilt to make her a bit more interesting Inside the card reads
"You don't look a day over whatever age your pretending to be" 
Now I am going to do some with the boy on it


cake on fire


As soon as I saw this set of stamps https://payhip empty pockets set I  had to have it as I know a few people who will get a card from me out of this set
The background has been embossed with the Happy Birthday folder, I then swiped the top, with Old Paper, distressed ink Then adhered to white base card The image is two stamps I printed out onto white card, coloured with copics, then distress inked around the edges and over the card randomly. The fire extinguisher I printed off the  net

Saturday 19 September 2020

Dandelion


JJ the gardener image, looked on the net for a sentiment saw this one so printed them out. I coloured her with copics found a stamp in my collection and stamped them on with a distress ink, I then adhered her to backing paper, the colour worked, then onto white base card
Was a quick make for my daughter in law, as she decided to grow flowers on their lifestyle block to sell, but first she has to get rid of the dandelions
Am putting this in
 

Friday 18 September 2020

On the farm

While on our travels I saw a sign on a farm saying we grow our own bacon and eggs with a picture of a pig and chicken it has always stuck in my mind so this card is based on that sign

The three images are from Bugaboo so it was just a matter of resizing and placing where I wanted them. The backing paper was from a stack pad called all about the boys. Coloured the image with copics and distress inked the edges. Tied some string around the card and added a button. Adhered onto white base card
Am entering this at

Wednesday 16 September 2020

Fairy Dust

My card for the DT at creativeknockouts is this lovely Fairy is from crafty sentiments called Flora With Flowers

I don't normally do fairies  but there is a first time for everything, I liked the butterfly backing paper and the yellow card was the best it went with,I adhered paper to card then adhered lace to bottom then adhered to white base card, coloured the fairy with copics distress inked the edge  adhered her to the yellow card sentiment was done on the computer, added all the pearls and a bow on the ribbon


Monday 14 September 2020

Thanks

 At creative knockouts this week is Fall. Here in New Zealand we don't celebrate it and it's coming into our summer, so this card was a bit of a challenge for me

The card swap, for a card group I am in, was swinking, the idea being that with your ink pads  you start by swiping your ink pad heavy from the top and  pull it up so it is lighter at the end, gradually building up colour as you can see this is what it ended up like
I then cut a frame and embossed it then wiped over my frame with distress ink as I didn't want it to be a stark white I then adhered the frame to the card and then onto a white base card
The digi and sentiment I put onto word,  I put the sentiment onto the message note, then printed it off  I cut the digi with a border on the scan n cut then  coloured it with copics, I used a wink of stellar on the grapes not that it is really visible
So this card went to my swap buddy and was also my DT card


Saturday 12 September 2020

Another Birthday another friend

 I like making birthday cards for friends as you can do what they like and my friend likes frogs

This card folded into three so on the front and second panel I die cut the bull rushes and grass did a couple of wonky w's they were my birds I also used distress ink to make a sky and ground
I don't know but by this time she was probably wondering what was next as once sent her a card and when she opened it  all the bits you get from punches ect came falling out

But no it was just this fella wishing her a happy birthday


Birthday Thoughts


This is for a friends Birthday I used a Silk Gloss card for my base not a good idea as it doesn't want to fold properly,Also had to make a new template for this card as the original was rather large
I got another piece of white card adhered  die cuts to two corners Flowers,leaves,and gems from my stash
Also found this sentiment in my stash, think it came from a card sent to me from someone in my card group, that I deconstructed so if you see this and think this was mine... Thank You

I adhered a strip of white silk ribbon on the sides and front  threaded the lace with pale pink ribbon these were adhered to panel last so I didn't get them dirty


Wednesday 2 September 2020

The Garage

This week at creativeknockouts the theme is charms 

The image I had to use for my card is the little mechanic and the dads garage logo
I decided to make an easel card  
I found a image off the net that was a wall of a garage I then added a front frame coloured it with copics added the garage sign, found a few tires and an oil drum and my garage was made

My next mission was the bottom of the card finally found in my stash some backing paper that looked like concrete with a lot of oil stains on it
I then got my image and coloured it with copics put a couple oil stains on his clothes cut out the image and placed it on the drive so it looked like it was up on the blocks tool box was a digi stamp did the sentiment on the computer added the keys for my charm


This is another card with the same image it reminded me of my younger brother and his pedal car which looked a lot like this and he was always fixing it  aand years later he became a mechanic 
So this will be his next birthday card


Wednesday 26 August 2020

Alex's Creation

 I pick my grandson Alex up twice a week after school and we have a routine food, homework, game or puzzle then computer. He would be on the computer all the time if he had his way but being the responsible Nana ðŸ˜‰ I only let him on for about 15 minutes before his mum comes to pick him up. So we were looking through Pinterest at things we could do (I have a folder with projects for the grandchildren) and he decided he could do this

So Alex was to find some pine cones from his place they have a 10 acre life style block. Pop found us this neat piece of bark. The bark was left to dry on top of the coal range and Alex came last week with the cones


So yesterday we hot glued the sticks to the bark then some rope ribbon with leaves on onto the bark, then the pine cones then came the googly eyes the round things on the bark is the cones before they grew                                                          The pine cones were to represent him and his mum and dad the two dogs the two cats  and the 5 round ones are the chickens, the cow's and sheep are still in the paddock

And here he is so proud of his creation, his mum loved it (so she said)  So for our next project we are off to the beach for some big stones we are going to paint


The Mechanic

 Love this image, reminds me of my younger brother and his pedal car ..and .. he grew up to be a mechanic

I used the sketch from The Paper Players challenge The colours from the just add ink challenge and the theme from the Crafters cottage challenge dots and or stripes
The image I coloured with copics I went around the edges of the image with a dark blue copic, normally I would use distress ink on the edges but this time I wanted a cleaner look
The inside of the card I put the patterned paper in the two corners of a piece of card and adhered to card

Am entering these challenges


Wednesday 19 August 2020

Another Gnome

 Gnomes are not just for christmas and these guys look like they are having fun

Adhered green backing paper to white base card and put a triangle both ends then the yellow card in the centre I printed off the gnomes coloured with copics then adhered with foam to slightly 3d it I did the sentiment on the computer adhered to  yellow card punched a hole and tied some string to it  
The sentiment reads  
Wanna hang with ya Gnomies, and inside tthe card reads  you dont have to be crazy to be my friend I'll teach you

Gnomes

I am not really a gnome person but there was something about these guys 

I used a 5"x5" red base card adhered christmas light backing paper from a christmas pad, printed off the gnomes and coloured with copics then adhered to red card. I saw this sentiment on the net last year and thought it was rather good so here it is on this card, Inside card says we wish you a merry christmas
This card I printed the image a bit big,coloured it with copics and adhered it to another white card then onto  a white 5"x5" base card rather pleased with how it turned out

The Virus

 Haven't been card making for a couple of weeks due to the corona virus poking it's head up here in New Zealand again so i have been busy making masks for the family grand kids ect and not just plain material for the kids patterned please, just as well I have plenty of material hanging around from my sewing days and my Teddy that sits in the window of my creaft room watching the world go by even has his own face mask, was a bit of fiddling because of his nose but I might have to make him another bright one so he has a change


Monday 10 August 2020

Indi is 3


Indie has turned 3 So another trip to chipmunks "whoopee"                                                                  Her favourite colour at the moment is purple I printed off the image coloured her with copics, die cut oval and scallop with cuttlebug distress inked them both and adhered to purple card base, die cut the Happy then stamped it (with the help of my stamp buddy) was really a quick card to doColour scheme for TGIF challenge 
 Am entering at                                                                                       http://pennyschallenges.blogspot.com/                               http://tgifchallenges.blogspot.com/2020/08/tgifc276-color-challenge.html


Tuesday 4 August 2020

instant Fun


This week at creativeknockouts. the theme is for sparkles
I used a cream base card covered it with a matstack backing paper all about the girls, not that it is very noticeable but the dots are sparkly, I die cut a doily, a scallop and a round that had the image on. I coloured the image with copics then put a thin line of glue around the rim of the glass and sprinkled it with glitter, The bow I put a stick on gem on, Made another bow with organza ribbon and put a larger gem in the middle I printed the bottle of prosecca onto cream card cut it out and adhered to card The sentiment I cut in half to make it top and bottom
Inside the card I put "drinks well with others" and another bottle of wine 
I am entering this card at

Saturday 1 August 2020

Happy Thoughts


This Bugaboo stamp I have had for ages so finally I am using it. It is for a sick grandchild who is too young for a get well card but would still like a card
I coloured it with copics then cut it out on the scan n cut, I have put a border around it. I then cut another  border piece with a wider border in brown. I stamped the sentiment and adhered to card. The backing paper is from a Natural Matstack
Am entering